Note: Consult a doctor for health advice. Check out my favorite health products here: [Amazon Store] (Amazon Affiliate commission applies)
Best Affordable Tripods for Recording Yoga Classes on a Smartphone
Discover budget-friendly tripods to enhance your yoga recordings. From tall aluminum stands to flexible options, find the perfect gear for professional-quality flows in your digital studio. Best Affordable Tripods for Recording Yoga Classes on a Smartphone
YOGA GEAR
Rajesh Kumar
3/21/20266 min read
Finding Your Balance: Best Affordable Tripods for Recording Yoga Classes on a Smartphone
My dear friends, the landscape of our practice has changed. Once confined to the sacred space of a shala or a dedicated studio, yoga is now shared around the world, beaming from living rooms, backyards, and local parks. This shift towards online teaching is an incredible opportunity. It allows us to reach students who may otherwise never have the chance to step onto a mat, whether due to time, location, or physical limitations.
However, the transition from a physical class to a virtual one isn't without its challenges. As many of you have likely discovered, the quality of your video can dramatically impact the experience for your students. We all want our students to be present, to breathe, and to connect, but a shaky phone propped up on a stack of books, or an unstable frame that crops out your head, isn't helping.
It's a common struggle. The moment you press 'record,' you shouldn't have to be constantly checking if the shot is right. As far as reality is concerned, if the audio or the visual is poor, a student will disengage, no matter how profound your teachings are.
Let's explore this now—how a small, affordable piece of equipment can revolutionize your teaching and bring a level of stability and professionalism to your practice.
The Selfie Struggle: Why a Propped Phone Won't Cut It
I’ve been there. My first attempt at recording a full-length class involved a precarious arrangement of a coffee table, two thick novels, and an unusually shaped flower vase. I spent 20 minutes getting the angle just right, only to have my pet nudge the setup two minutes into the first pranayama. The resulting video was off-center, dizzying, and utterly distracting.
This is the central issue. Without taking up any more time, let's proceed with finding a better way. We’re teachers, not filmmakers, but the demand for a clean, stable frame is real.
A tripod offers three critical things that a pile of books cannot:
Reliability: You can set it, lock it, and forget it, knowing the shot will be consistent throughout your practice.
Safety: It protects your expensive smartphone from falling.
Versatility: It allows you to quickly adjust the height, angle, and orientation (portrait for social media, landscape for YouTube) to perfectly capture the sequence you've planned.
A stable image allows your students to focus on your movements, your cues, and their own breath, which is where the magic really happens.
The Yoga Tripod Checklist: What Matters Most
In my experience, the tripods designed for professional wildlife photography or heavy studio cameras are overkill (and over-budget) for a smartphone-wielding yogi. What we need is a different set of priorities.
When you’re looking for a tripod to record a yoga class, keep these factors in mind:
1. Maximum Height
This is paramount. A standing yoga sequence can easily put you five or six feet in the air. A short, tabletop tripod will force you into an awkward, upward-looking angle that is rarely flattering or practical. You need a tripod that can extend to eye level or higher to ensure your entire body, from tadasana to savasana, is in frame. Look for a max height of at least 60 inches (152 cm).
2. Stability
This isn’t just about the legs; it's about the entire build. A flimsy tripod might be fine indoors, but it will tremble if you’re recording on a slightly uneven floor or outdoors with a gentle breeze. Pay attention to the center column and the leg joints—they are the first points of failure. The last thing you want is a wobbly shot during a delicate balancing pose.
3. The Tripod Head
This is the mechanism that connects the tripod body to your phone. It allows you to pan, tilt, and rotate. Look for a head that can easily tilt down (for mat work) and rotate (for portrait orientation) without the need to rearrange the entire setup. A simple, smooth-operating ball head or a pan-tilt head with a quick-release plate is essential.
4. Compact and Lightweight
You need something you can easily store in a closet, slide behind a door, or even pop into your bag if you're taking your practice to a local park. Portability is a major asset for a busy instructor.
5. Cost
This is the heart of the matter. You can get a solid, usable tripod without breaking the bank. The tripods on this list all focus on delivering the most important features (height, stability, movement) at a price that won’t derail your budget.
My Affordable Recommendations
Finding "the best" affordable option isn’t about just one product; it's about finding the right type of tripod for your specific teaching style and location.
1. The Traditional Aluminum 'Workhorse'
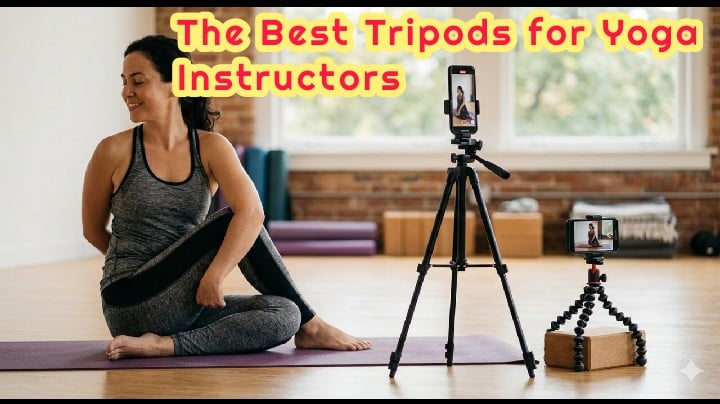
These tripods are classic for a reason. They offer the best balance of height, stability, and price. They typically feature three-section extendable legs and a crankable center column. The aluminum construction makes them robust enough to handle various terrains without being overly heavy. Look for models that come with a dedicated smartphone mount (many do). This style is perfect if your priority is a tall, reliable stand.
2. The Flexible 'Go-Anywhere' Tripod
You’ve seen these: tripods with segmented, wrapping legs that look like they belong on a science fiction robot. Their primary advantage is adaptability. They are typically much shorter, but they don't have to stand on a flat surface. You can wrap them around a railing, a sturdy tree branch, or the back of a chair. This makes them invaluable for recording in unique, cramped, or unconventional locations where a standard tripod won't fit. Their main drawback is max height, which is rarely enough for a full-body standing shot, but they are great for focused mat-work or meditations.
3. The Desktop/Tabletop Solution (A Great Secondary Angle)
While not ideal as your only tripod, a sturdy tabletop stand can be very effective for recording close-up adjustments, focused mudras, or pranayama sessions. They are compact, inexpensive, and often more stable than a larger tripod at its minimum height. Many advanced instructors find a great use for these in setting up a "multi-camera" experience where they switch angles during a recording.
4. The Modern 'Ring Light' Combo
This is a newer, popular hybrid. It’s a standard tripod with a flexible arm that extends to support an integrated, dimmable LED ring light. The phone mount usually sits directly in the center of the ring. This is a powerful, space-saving solution, especially if you record indoors or in low-light conditions. A ring light provides flattering, even illumination that can make even a dimly lit corner look like a professional studio.
How to Choose Your Perfect Match
Priority 1: Height. If your practice is a lot of standing and balancing, a tall, traditional aluminum model is your best bet.
Priority 2: Adaptability. If you travel or record in tiny spaces, consider a flexible-leg model.
Priority 3: Lighting. If you teach early in the morning, late at night, or in a room with few windows, a ring light combo is worth the small extra investment.
Final Tips for Recording Seamless Yoga Classes
Once you have your tripod set, remember a few key things to make your video truly sing:
1. The Right Camera App
Most smartphones have great default video apps, but sometimes they want to automatically track you or adjust exposure. Before you hit record, lock your focus and exposure on the spot where your mat will be. This prevents the phone from constantly adjusting while you move, which can be very distracting.
2. Set Up Your Frame First
Get on the mat before you record. Check the frame for any "visual clutter" like power cords, discarded water bottles, or stacked blankets. Ensure you have enough headroom when standing and that your arms aren't cut off when you extend them.
3. Lighting is Critical
A common mistake is to place the light source behind you. If you have a window, it should be in front of you, bathing you in natural light. Avoid using harsh overhead lights which can cast long, strange shadows and give you a sallow look. Natural light is always best, but a dedicated ring light is the best secondary option.
My dear friends, the journey of sharing yoga online is a gift. It’s not about having a professional film crew; it's about connecting with your students with clarity and steadiness. By choosing the right tool for the job, you remove the obstacles to focus and presence. You can stabilize your camera, and your students, in turn, can stabilize their practice. This small step can make all the difference. Namaste.
Contact
rkyogablog@gmail.com