Note: Consult a doctor for health advice. Check out my favorite health products here: [Amazon Store] (Amazon Affiliate commission applies)
Essential Vlogging Gear for Yoga Content Creators on YouTube
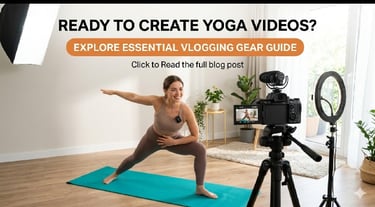
Are you looking to start a yoga YouTube channel but don't know what equipment to buy? Discover the essential vlogging gear for yoga content creators in this simple guide to help you get started.Essential Vlogging Gear for Yoga Content Creators on YouTube
YOGA GEAR
Rajesh Kumar
3/29/20265 min read

My dear friends, how is everyone doing today? I hope you’re all finding some peace on your yoga mats and feeling great.
Lately, so many of you have been reaching out with the same question: "Hey, I want to start my own yoga YouTube channel, but what gear do I actually need?" Honestly, I remember when I first hit the record button on my camera. I thought a phone and a little bit of courage were all it took. But as time went on, I learned from a lot of messy mistakes that the right gear can really take your videos from "just okay" to looking totally professional.
Without further ado, let’s proceed and look at exactly what you need to share your yoga journey with the world.
Finding the Best Camera for Your Yoga Flows
A lot of people think they need to drop thousands of dollars on a fancy camera right away. In my experience, the best tool to start with is already in your pocket—your smartphone. Modern phones have such incredible cameras that you can shoot high-quality 4K video without much effort.
I’ve observed that even some of the biggest yoga influencers still use their iPhones or Samsung phones for their daily content. But here is a little secret: always use the back camera. I know it’s tempting to use the selfie camera so you can see yourself, but the quality just isn't the same.
Now, if you do have a little bit of a budget and want to step things up, I feel that a "mirrorless camera" is the way to go. I personally love the Sony ZV-1 or the Canon M50. These are made specifically for people who make videos. The best part is the "flip-out" screen. It lets you see exactly where you are in the frame while you’re holding a difficult pose. Trust me, there is nothing worse than finishing a grueling thirty-minute flow only to realize your head was cut off the entire time!
Getting That Crystal Clear Audio
Let’s talk about the one thing people usually forget—the sound. My dear friends, please listen to me on this one: people will watch a video that looks a little grainy, but they will click away instantly if the sound is bad.
When we do yoga, we are usually five to ten feet away from the camera. If you just use your phone’s built-in mic, your voice is going to sound like it’s coming from the bottom of a well. You’ll hear every car driving by and every echo in the room. I remember one of my first videos where I was trying to teach a breathing exercise, but because the mic was so far away, my breathing sounded like a literal windstorm! It was a total disaster.
I highly recommend getting a wireless lapel microphone. You can just clip it right onto your shirt or sports bra. Brands like Rode or even the more affordable Boya make great wireless options. This way, no matter where you move on your mat, your voice stays clear and close to your audience. It makes it feel like you’re right there in the room with them, guiding them through every stretch.
Lighting Up Your Practice Space
In my experience, lighting can completely change the "vibe" of your video. You could have the most expensive camera in the world, but if the lighting is bad, the video is going to look dull.
The best (and free!) way to light your videos is natural sunlight. Try to set up your mat in front of a big window. Just make sure the light is hitting your face and not coming from behind you. If the light is behind you, you’ll just look like a dark shadow on the screen, and your viewers won't be able to see your alignment.
But what if you’re shooting at night or in a room without windows? That’s where a ring light or a softbox comes in. A ring light gives your eyes a nice little sparkle and makes your skin look really smooth. Personally, I like using two softbox lights—one on the right and one on the left. It keeps the light even across the whole mat and makes everything look like it was filmed in a professional studio.
Why a Sturdy Tripod is a Must-Have
Now, let's chat about the little guy that holds everything together—the tripod. I’ve seen so many people try to propping their phone up on a stack of books or leaning it against a chair. Let me tell you, that is a recipe for a broken phone.
I learned this the hard way. I was right in the middle of a tricky balancing pose when my phone slid off a pile of books and crashed onto the floor. Not only did I lose the recording, but I also ended up with a nasty scratch on my screen. After that, I realized that a good tripod is worth every penny.
For yoga, you need a tripod that can stand at least five or six feet tall. This lets you shoot at "eye level," which feels much more natural for the viewer. If you like to take your practice outdoors to a park or a beach, a "GorillaPod" is a lifesaver. Its legs are flexible, so you can wrap it around a tree branch or a fence post to get those cool, unique angles.
Picking the Right Background and Mat
Your background says a lot about who you are. Yoga is all about peace and calm, so your space should reflect that.
I feel that you don’t need anything fancy. A clean wall, a couple of green plants, and maybe a nice candle are all you really need. If there’s too much clutter in the background, your viewers will get distracted.
And don't forget your yoga mat! Try to pick a mat color that stands out from your clothes and your background. If you have white walls and a white mat, you’re just going to disappear into the room. A dark blue or a deep green mat usually looks beautiful on camera and helps the viewer see your movements more clearly.
Don't Forget the Small Stuff
There are a few tiny accessories that make a huge difference. One is a remote shutter. It’s a tiny little button you can connect to your phone or camera. It lets you start and stop the recording while you’re already sitting on your mat. No more awkward footage of you running back and forth to the camera!
Also, always keep extra memory cards and a power bank handy. Yoga videos can be long, and shooting in high resolution eats up battery life and storage space faster than you’d think. I remember one time I was filming a beautiful sunset flow, and my camera died right as the sun was hitting the horizon. That moment was gone forever. Always be prepared!
Easy Tools for Editing Your Videos
Once you’ve finished shooting, the real magic happens in the editing. But don't worry—you don't need to be a Hollywood director to do this.
If you’re just starting out, mobile apps like InShot or VN Video Editor are amazing. They are super simple to use. You can trim out the parts where you were fixing your hair or setting up the camera, and you can add some calm background music. Just make sure the music is soothing and doesn't drown out your voice.
If you want to use a computer, CapCut or Adobe Premiere Rush are great choices. Keep it simple. Cut out the boring parts, make sure the colors look bright, and you’re good to go. Your video will look professional and polished in no time.
My dear friends, at the end of the day, all this gear is just a tool. The most important part is your heart and the way you share your practice. I’ve seen people with the most expensive setups whose videos feel empty, and I’ve seen people with an old phone change thousands of lives.
As far as reality is concerned, people want to connect with you, not your expensive camera. So, start with what you have, keep practicing, and upgrade your gear as you grow.
Are you ready to film your first yoga video? I’d love to hear about it! Tell me in the comments—what’s the one piece of gear you’re most excited to get?
Contact
rkyogablog@gmail.com